Close Menu
  • Home
  • About Us
  • General
  • Hardware Hacking
  • Wireless
  • Web
  • Hacking Courses
    • OSCP
    • The Virtual Hacking Labs
    • Certified Ethical Hacker (CEH)
    • Hacking Books
  • More
    • Exploit tutorials
    • Pentesting Exchange
    • Networking
    • Malware Analysis
    • Scanning
    • Metasploit
    • Hacking Metasploitable 2/3
    • Digital Forensics
  • Contact
Facebook X (Twitter) Instagram
Trending
  • CVE-2022-3602 and CVE-2022-3786: OpenSSL 3.0.7 patches Critical Vulnerability
  • Installing Rogue-jndi on Kali Linux
  • Log4Shell VMware vCenter Server (CVE-2021-44228)
  • The Great Leak: Microsoft Exchange AutoDiscover Design Flaw
  • CVE-2019-19781: Citrix ADC RCE vulnerability
  • Vulnerability Scanning with OpenVAS 9 part 4: Custom scan configurations
  • Vulnerability Scanning with OpenVAS 9 part 3: Scanning the Network
  • Vulnerability Scanning with OpenVAS 9 part 2: Vulnerability Scanning
Facebook X (Twitter) YouTube Tumblr Instagram Pinterest
Hacking Tutorials
  • Home
  • About Us
  • General
  • Hardware Hacking
  • Wireless
  • Web
  • Hacking Courses
    • OSCP
    • The Virtual Hacking Labs
    • Certified Ethical Hacker (CEH)
    • Hacking Books
  • More
    • Exploit tutorials
    • Pentesting Exchange
    • Networking
    • Malware Analysis
    • Scanning
    • Metasploit
    • Hacking Metasploitable 2/3
    • Digital Forensics
  • Contact
Hacking Tutorials
You are at:Home » web-application-hacking » Uniscan Webserver fingerprinting in Kali Linux
Webserver fingerprinting with Uniscan in Kali Linux

Uniscan Webserver fingerprinting in Kali Linux

2
By Hacking Tutorials on August 10, 2015 Web Applications

Uniscan is a simple but great tool for Remote File Include, Local File Include and Remote Command Execution vulnerability scanner. In this tutorial we will be exploring the webserver fingerprinting functionality in Uniscan on Kali Linux. The webserver fingerprinting functionality in Uniscan peforms a ping, traceroute, NS lookup, OS detection and service scan with Nmap on the specified target.

Uniscan Webserver fingerprinting Tutorial

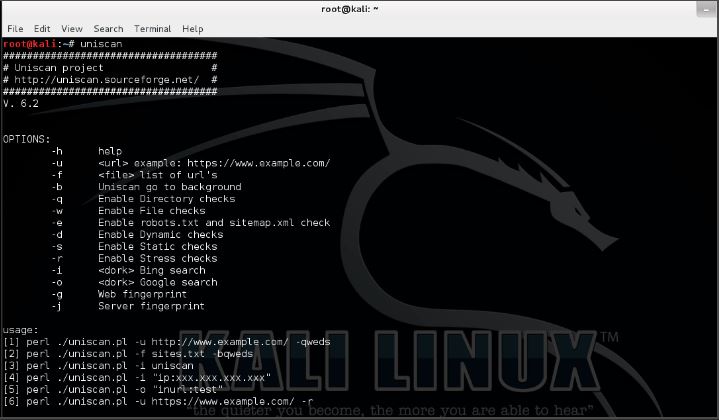
Let’s start with opening a terminal and run Uniscan with the following command to get an overview of options:

uniscan

Uniscan Webserver Fingerprinting -1

We will be running Uniscan again with the -j Server fingerprint flag on a specified target using the following command (this will take a little while to finish):

uniscan -u [target]-j

Uniscan Webserver Fingerprinting -2

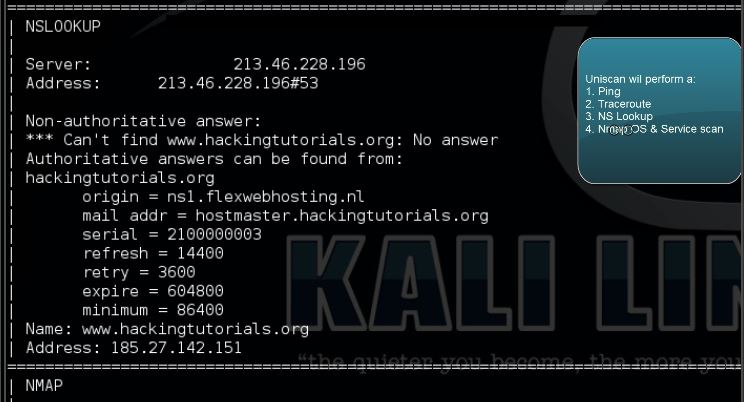
As mentioned earlier, Uniscan will perform a ping, traceroute, NS lookup and Nmap OS & Service scan. From which in particular the Nmap scans take a little while to finish. In the meantime we will be looking at the different scans in general and what they do:

Ping

The name ping comes from sonor terminology which uses sound and echo’s to detect objects underwater. As a network utility a Ping is used to test the reachability of a specified host. By sending and ICMP echo request packet to the specified host and waiting for a reply the roundtrip time can be measured and packet loss and reception will be calculated.

Traceroute

A trace route is a diagnostic tool for displaying the route and measuring transit delays of packets across an IP network. The path of the route is recorded together with the round-trip times from each successive host in the route. Traceroute continues unless all sent packets are lost more than twice, this means a loss of connection.

NS Lookup

NS Lookup stands for Name Server Lookup and is used to obtain the domain name or the IP address or for any other specific DNS record.

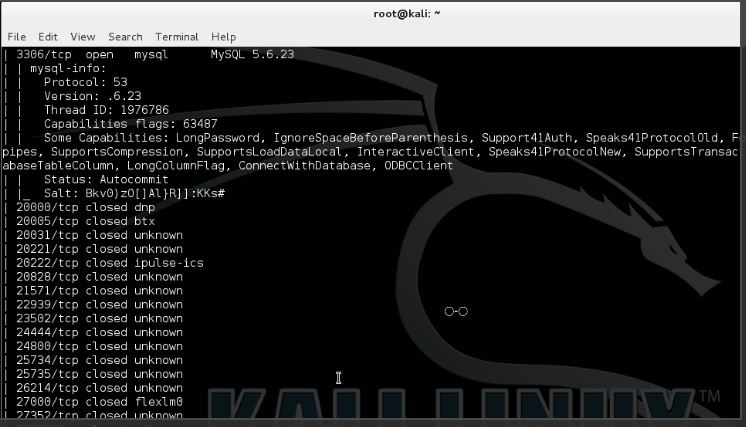
Nmap OS detection & Service scan

The Nmap OS detection scan returns the operating system of the specified host and the service scan does scan for ports and relates them to known services with the version number if available.

More information about the service scan can be read here.

When the scan is finished you can scroll back for the details Uniscan returned during the webserver fingerprinting scan:

Uniscan Webserver Fingerprinting -3

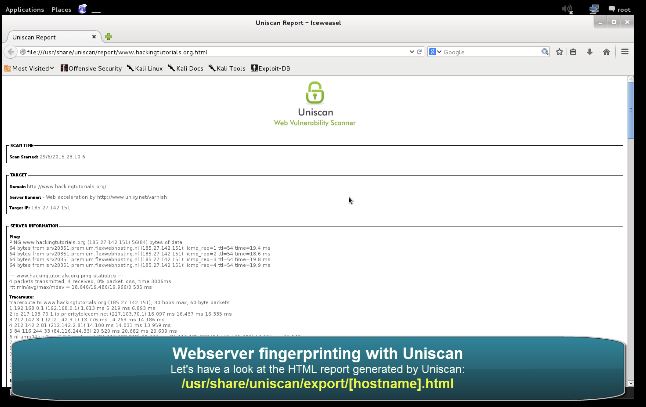
Another great feature of Uniscan is the option to export the results as a HTML page. The html page is stored at the following location (or click the link from the terminal):

/usr/share/uniscan/export/[hostname].html

In Kali Linux 2.0 the correct path to the report is:

/usr/share/uniscan/report

Uniscan Webserver Fingerprinting -4

In the upcoming tutorials we will be exploring more functions in Uniscan.

Uniscan Video Tutorial

Thanks for watching and please subscribe to my YouTube channel for more hacking tutorials :)

Virtual Hacking Labs - Penetration testing lab

If you’re interested in learning more about web penetration testing you can follow any of these online courses:


Online Hacking Courses


Web Penetration Tester

You will learn hacking tools, methodologies and techniques. This is a both practical and theoretical step-by-step course. Read more…

How to be an Independent security researcher

If you are a web developer, Bug Hunter or any it security researcher then this course will be very help full.
Read more…

Share. Facebook Twitter Pinterest LinkedIn Tumblr Email
Previous ArticleMetasploit CVE-2015-5122 Flash Exploit Tutorial
Next Article How to disable Wi-Fi Sense on Windows 10

Related Posts

Installing Rogue-jndi on Kali Linux

Log4Shell VMware vCenter Server (CVE-2021-44228)

Vulnerability Scanning with OpenVAS 9 part 4: Custom scan configurations

2 Comments

  1. Jason on October 24, 2015 11:44 pm

    In Kali 2.0 the correct path is:

    /usr/share/uniscan/report

    Reply
    • Hacking Tutorials on October 25, 2015 10:51 am

      Thanks for commenting, I’ve added the correct filepath in the tutorial :)

      Reply
Leave A Reply Cancel Reply

Top Tutorials
By Hacking TutorialsOctober 29, 20220

CVE-2022-3602 and CVE-2022-3786: OpenSSL 3.0.7 patches Critical Vulnerability

By Hacking TutorialsJanuary 10, 20220

Installing Rogue-jndi on Kali Linux

By Hacking TutorialsDecember 17, 20210

Log4Shell VMware vCenter Server (CVE-2021-44228)

By Hacking TutorialsSeptember 27, 20210

The Great Leak: Microsoft Exchange AutoDiscover Design Flaw

By Hacking TutorialsFebruary 4, 20200

CVE-2019-19781: Citrix ADC RCE vulnerability

By Hacking TutorialsNovember 1, 20188

Vulnerability Scanning with OpenVAS 9 part 4: Custom scan configurations

Recent Tutorials
  • CVE-2022-3602 and CVE-2022-3786: OpenSSL 3.0.7 patches Critical Vulnerability
  • Installing Rogue-jndi on Kali Linux
  • Log4Shell VMware vCenter Server (CVE-2021-44228)
  • The Great Leak: Microsoft Exchange AutoDiscover Design Flaw
  • CVE-2019-19781: Citrix ADC RCE vulnerability
Virtual Hacking Labs
Penetration Testin Course and Hacking Labs
Categories
  • Digital Forensics
  • Exploit tutorials
  • General Tutorials
  • Hacking Books
  • Hacking Courses
  • Malware Analysis Tutorials
  • Metasploit Tutorials
  • Networking
  • Pentesting Exchange
  • Scanning Tutorials
  • Web Applications
  • Wifi Hacking Tutorials
Downloads
  • directory_scanner.py (541126 downloads )
  • PEiD-0.95-20081103.zip (465409 downloads )
  • wifi_jammer.py (565680 downloads )
Recent Tutorials
  • CVE-2022-3602 and CVE-2022-3786: OpenSSL 3.0.7 patches Critical Vulnerability
  • Installing Rogue-jndi on Kali Linux
  • Log4Shell VMware vCenter Server (CVE-2021-44228)
  • The Great Leak: Microsoft Exchange AutoDiscover Design Flaw
  • CVE-2019-19781: Citrix ADC RCE vulnerability
  • Vulnerability Scanning with OpenVAS 9 part 4: Custom scan configurations
Popular Tutorials
By Hacking TutorialsSeptember 1, 2016115

Review: Offensive Security Certified Professional (OSCP)

By Hacking TutorialsApril 18, 201738

Exploiting Eternalblue for shell with Empire & Msfconsole

By Hacking TutorialsMarch 17, 201637

Installing VPN on Kali Linux 2016 Rolling

Featured Downloads
  • directory_scanner.py (541126 downloads )
  • PEiD-0.95-20081103.zip (465409 downloads )
  • wifi_jammer.py (565680 downloads )
© Hacking Tutorials 2022

Type above and press Enter to search. Press Esc to cancel.

Go to mobile version